| Opens | Press Windows + R and type: |
Open Documents Folder |
documents |
Open Videos folder |
videos |
Open Downloads Folder |
downloads |
Open Favorites Folder |
favorites |
Open Recent Folder |
recent |
Open Pictures Folder |
pictures |
Adding a new Device |
devicepairingwizard |
About Windows dialog |
winver |
Add Hardware Wizard |
hdwwiz |
Advanced User Accounts |
netplwiz |
Advanced User Accounts |
azman.msc |
Backup and Restore |
sdclt |
Bluetooth File Transfer |
fsquirt |
Calculator |
calc |
Certificates |
certmgr.msc |
Change Computer Performance Settings |
systempropertiesperformance |
Change Data Execution Prevention Settings |
systempropertiesdataexecutionprevention |
Change Data Execution Prevention Settings |
printui |
Character Map |
charmap |
ClearType Tuner |
cttune |
Color Management |
colorcpl |
Command Prompt |
cmd |
Component Services |
comexp.msc |
Component Services |
dcomcnfg |
Computer Management |
compmgmt.msc |
Computer Management |
compmgmtlauncher |
Connect to a Projector |
displayswitch |
Control Panel |
control |
Create A Shared Folder Wizard |
shrpubw |
Create a System Repair Disc |
recdisc |
Data Execution Prevention |
systempropertiesdataexecutionprevention |
Date and Time |
timedate.cpl |
Default Location |
locationnotifications |
Device Manager |
devmgmt.msc |
Device Manager |
hdwwiz.cpl |
Device Pairing Wizard |
devicepairingwizard |
Diagnostics Troubleshooting Wizard |
msdt |
Digitizer Calibration Tool |
tabcal |
DirectX Diagnostic Tool |
dxdiag |
Disk Cleanup |
cleanmgr |
Disk Defragmenter |
dfrgui |
Disk Management |
diskmgmt.msc |
Display |
dpiscaling |
Display Color Calibration |
dccw |
Display Switch |
displayswitch |
DPAPI Key Migration Wizard |
dpapimig |
Driver Verifier Manager |
verifier |
Ease of Access Center |
utilman |
EFS Wizard |
rekeywiz |
Event Viewer |
eventvwr.msc |
Fax Cover Page Editor |
fxscover |
File Signature Verification |
sigverif |
Font Viewer |
fontview |
Game Controllers |
joy.cpl |
IExpress Wizard |
iexpress |
Internet Explorer |
iexplore |
Internet Options |
inetcpl.cpl |
iSCSI Initiator Configuration Tool |
iscsicpl |
Language Pack Installer |
lpksetup |
Local Group Policy Editor |
gpedit.msc |
Local Security Policy |
secpol.msc |
Local Users and Groups |
lusrmgr.msc |
Location Activity |
locationnotifications |
Magnifier |
magnify |
Malicious Software Removal Tool |
mrt |
Manage Your File Encryption Certificates |
rekeywiz |
Microsoft Management Console |
mmc |
Microsoft Support Diagnostic Tool |
msdt |
Mouse |
main.cpl |
NAP Client Configuration |
napclcfg.msc |
Narrator |
narrator |
Network Connections |
ncpa.cpl |
New Scan Wizard |
wiaacmgr |
Notepad |
notepad |
ODBC Data Source Administrator |
odbcad32 |
ODBC Driver Configuration |
odbcconf |
On-Screen Keyboard |
osk |
Paint |
mspaint |
Pen and Touch |
tabletpc.cpl |
People Near Me |
collab.cpl |
Performance Monitor |
perfmon.msc |
Performance Options |
systempropertiesperformance |
Phone and Modem |
telephon.cpl |
Phone Dialer |
dialer |
Power Options |
powercfg.cpl |
Presentation Settings |
presentationsettings |
Print Management |
printmanagement.msc |
Printer Migration |
printbrmui |
Printer User Interface |
printui |
Private Character Editor |
eudcedit |
Problem Steps Recorder |
psr |
Programs and Features |
appwiz.cpl |
Protected Content Migration |
dpapimig |
Region and Language |
intl.cpl |
Registry Editor |
regedit |
Registry Editor 32 |
regedt32 |
Remote Access Phonebook |
rasphone |
Remote Desktop Connection |
mstsc |
Resource Monitor |
resmon |
Resultant Set of Policy |
rsop.msc |
SAM Lock Tool |
syskey |
Screen Resolution |
desk.cpl |
Securing the Windows Account Database |
syskey |
Services |
services.msc |
Set Program Access and Computer Defaults |
computerdefaults |
Share Creation Wizard |
shrpubw |
Shared Folders |
fsmgmt.msc |
Signout |
logoff |
Snipping Tool |
snippingtool |
Sound |
mmsys.cpl |
Sound recorder |
soundrecorder |
SQL Server Client Network Utility |
cliconfg |
Sticky Notes |
stikynot |
Stored User Names and Passwords |
credwiz |
Sync Center |
mobsync |
System Configuration |
msconfig |
System Configuration Editor |
sysedit |
System Information |
msinfo32 |
System Properties |
sysdm.cpl |
System Properties (Advanced Tab) |
systempropertiesadvanced |
System Properties (Computer Name Tab) |
systempropertiescomputername |
System Properties (Hardware Tab) |
systempropertieshardware |
System Properties (Remote Tab) |
systempropertiesremote |
System Properties (System Protection Tab) |
systempropertiesprotection |
System Restore |
rstrui |
Task Manager |
taskmgr |
Task Scheduler |
taskschd.msc |
Trusted Platform Module (TPM) Management |
tpm.msc |
| Turn Windows features on or off | optionalfeatures |
| User Account Control Settings | useraccountcontrolsettings |
Utility Manager |
utilman |
Volume Mixer |
sndvol |
Windows Action Center |
wscui.cpl |
Windows Activation Client |
slui |
Windows Anytime Upgrade Results |
windowsanytimeupgraderesults |
Windows Disc Image Burning Tool |
isoburn |
Windows Explorer |
explorer |
Windows Fax and Scan |
wfs |
Windows Firewall |
firewall.cpl |
Windows Firewall with Advanced Security |
wf.msc |
Windows Journal |
journal |
Windows Media Player |
wmplayer |
Windows Memory Diagnostic Scheduler |
mdsched |
Windows Mobility Center |
mblctr |
Windows Picture Acquisition Wizard |
wiaacmgr |
Windows PowerShell |
powershell |
Windows PowerShell ISE |
powershell_ise |
Windows Remote Assistance |
msra |
Windows Repair Disc |
recdisc |
Windows Script Host |
wscript |
Windows Update |
wuapp |
Windows Update Standalone Installer |
wusa |
Versione Windows |
winver |
WMI Management |
wmimgmt.msc |
WordPad |
write |
XPS Viewer |
xpsrchvw |
Monday, 20 March 2017
Advanced Control panel Commands

Thursday, 16 March 2017
Easy way to Disable and Enable flashdrives in LINUX
Step 1:
First open the terminal(Ctrl + Alt + T).
Step 2:
Switch to the root mode or administrator mode in Terminal
# sudo bash

Step 3:
Type the following commands
# sudo chmod 444 /media/
This command is used for disable the media drives and including pendrive

Step 4:
# sudo chmod 777 /media/

This command is used for enable the media drives
Normally 4 is the changing the console permission
444 is represented from (r-- r-- r--) attributes
Normally 7 is the execute the file permission
777 is represented from (rwx rwx rwx) attributes.
Tuesday, 28 February 2017
How to install Joomla in windows
Step 1:
Download the XAMPP installer package at http://www.apachefriends.org/en/xampp.html
Step 2:
Run the installation file as you do with regular software and follow the step by step instructions.
Step 3:
Open “XAMPP Control Panel Application” and start “Apache” and “MySQL”.
Step 4:
Browse the localhost/phpmyadmin/
Step 5:
Create a new Database for joomla and create username and password for particular Database
Step 6:
Download the joomla from official site link
https://downloads.joomla.org/
Step 7:
Create a new folder in htdocs(eg: joomla30) and extract the downloaded pack to that particular folder
Step 8:
Go to the URL localhost/joomla30 and the continue following instructions
Step 9: Joomla admin panel configuration
i) Select the languages
ii) Enter the name of your site
iii)Choose the status for access your site(If u need access only in online click Yes otherwise select No)
iv) Enter your valid e-mail ID
v) Enter the custom username and password and Re-enter your password
Step 10: Database configuration
i) Select Database Type
ii) Hostname default is 'localhost'
iii)Enter username and password for particular DB
iv) Database is already we created like joomla30
v) Select the prefix of folder in Joomla
Step 11:
Now completed the configuration then you will get the window like this

Tuesday, 10 January 2017
How To install java and set environment path
Step 1:
First go to download the java pack using this link.
http://www.oracle.com/technetwork/java/javase/downloads/jdk8-downloads-2133151.html
Step 2:
Download the pack and right click to install, default path location is
"C:\Program Files\Java\jdk1.8.0_xx"
Step 3:
Now go to Advanced system settings in control panel and select advanced tab
Or
Select Windows key + break key and select advanced system setting in left side panel

Step 4:
Now select environment variables in advanced tab

Step 5:
Click new in local system variables and then type,
variable name : path
variable value : c:\Program Files\Java\jdk1.8.0_xx\bin;

Now click OK button and close the system variables.
Step 6:
Now you have to check "Javac" command in command prompt if u get messages without error now java is working fine.

Sunday, 1 January 2017
How To Import or Restore MSSQL(.BAK) DB
Step 1:
Open the SQL studio management

Step 2:
Enter your login credentials.

Step 3:
Select database option in your left panel then right click the database for create new database.

Step 4:
Enter a new database name for create DB. (eg: Database name is TEST) then Click next.

Step 5:
Now right click the test DB in left side panel then select task in sub menu and then select restore then click restore to database.
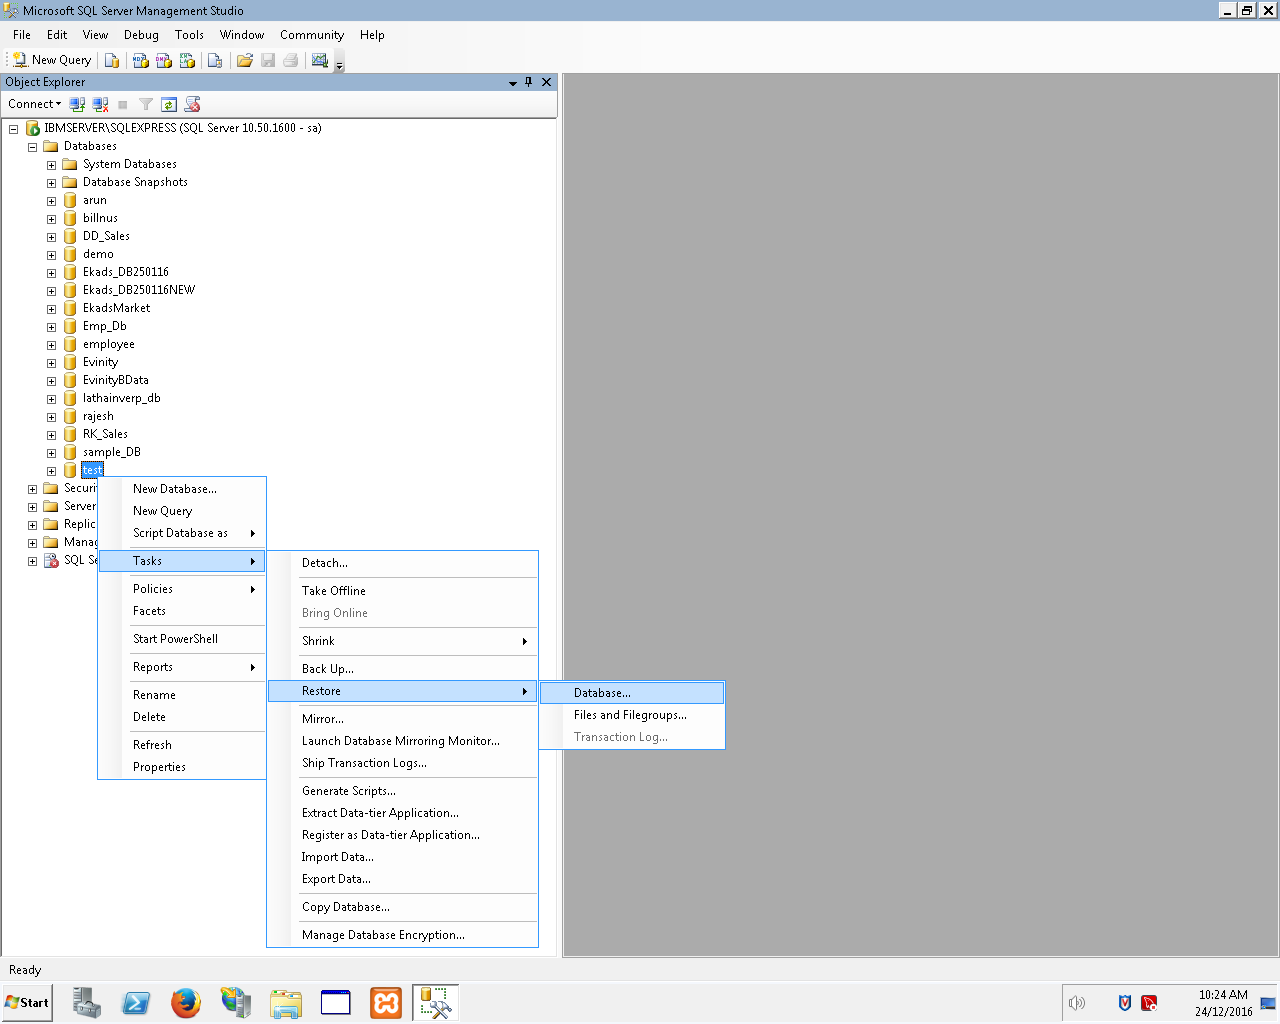
Step 6:
In windows, Select the radio button for restore the database from device and then click add button.

Step 7:
Select database for which database do u want to restore for test DB then click OK.(eg: test.bak)

Step 8:
Select check box restore in select backup sets to restore option.

Step 9:
Select the check box overwrite existing database and replication settings in restore options then click next.

Step 10:
DB restore process is sucessfully completed.

Saturday, 17 December 2016
Apache failed to start issues and solution
Method 1:
Apache failed
to start because of port is already assigned for another services
Solution:
Moved to
this location – c:\xampp\apache\conf\http.conf
Locate
the following lines
Listen 80
ServerName localhost:80
These
two lines change the port 80 to 82
Method 2:
Xampp
port 80 is busy
Solution:
Check
services.msc if web deployment agent service is running
Check if
skype is running, exit from skype
Check if
IIS is running, stop it
Method 3:
Apache
failed to start because process is already running in LINUX
Solution:
First
stop the default apache service in Linux
sudo
/etc/init.d/apache2 stop
Now
start the apache services
sudo
/opt/lampp/lampp start
OR
# sudo apt-get remove apache2
Method 4:
Apache failed to starting apachectl (Unable to start apache services)
Solution:
Apache process is not stopped properly so delete the httpd process and logs
/lampp/logs/httpd.pid
/lampp/var/mysql/$(hostname).pid
/lampp/var/proftpd.pid
(Delete those files)
After restart the apache services or forcefully start the services
After restart the apache services or forcefully start the services
strace
-Ff apachectl start
Method 5:
Apache failed to start because of port is already used.
Solution:
Check the PID using command prompt or terminal
For Windows: netstat -an

For Windows: netstat -an

Monday, 28 November 2016
How to Backup all Database in SQL server using query
Why Database backup is important?
An error
can arise when trying to write or read a file that is required to operate the
database. This is called disk failure because there is a physical problem
reading or writing physical files on disk. A common example is a disk head
crash, which causes the loss of all files on a disk drive. So database backup is important.
Step 1:
First open the sql management studio.
Step 2:
Login the sql management studio using credentials.

Step 3:
Select the database tab in left side panel.

Step 4:
Click new query button in the left corner of the page.

Step 5:
Enter the all database query in the query page.

Step 6:
Change the database storing location in the query.

Step 7:
Click execute for run the query

Step 8:
Finally query executed successfully

(All database backup Query)
DECLARE @name VARCHAR(50) -- database name
DECLARE @path VARCHAR(256) -- path for backup files
DECLARE @fileName VARCHAR(256) -- filename for backup
DECLARE @fileDate VARCHAR(20) -- used for file name
-- please change the set @path = 'change to your backup location'. for example,
-- SET @path = 'C:\backup\'
-- or SET @path = 'O:\sqlbackup\' if you using remote drives
-- note that remotedrive setup is extra step you have to perform in sql server in order to backup your dbs to remote drive
-- you have to chnage you sql server accont to a network account and add that user to have full access to the network drive you are backing up to
SET @path = 'D:\backup\' --set your backup path
SELECT @fileDate = CONVERT(VARCHAR(20),GETDATE(),112)
DECLARE db_cursor CURSOR FOR
SELECT name
FROM master.dbo.sysdatabases
WHERE name NOT IN ('master','model','msdb','tempdb')
OPEN db_cursor
FETCH NEXT FROM db_cursor INTO @name
WHILE @@FETCH_STATUS = 0
BEGIN
SET @fileName = @path + @name + '_' + @fileDate + '.BAK'
BACKUP DATABASE @name TO DISK = @fileName
FETCH NEXT FROM db_cursor INTO @name
END
CLOSE db_cursor
DEALLOCATE db_cursor
Subscribe to:
Posts (Atom)