Saturday 17 December 2016

Apache failed to start issues and solution


Method 1:
Apache failed to start because of port is already assigned for another services

Solution:

Moved to this location – c:\xampp\apache\conf\http.conf
Locate the following lines

Listen 80
ServerName localhost:80

These two lines change the port 80 to 82

Method 2:
Xampp port 80 is busy

Solution:

Check services.msc if web deployment agent service is running
Check if skype is running, exit from skype
Check if IIS is running, stop it

Method 3:
Apache failed to start because process is already running in LINUX

Solution:

First stop the default apache service in Linux
sudo /etc/init.d/apache2 stop  
Now start the apache services
sudo /opt/lampp/lampp start

OR

# sudo apt-get remove apache2

Method 4:
Apache failed to starting apachectl  (Unable to start apache services)

Solution:

Apache process is not stopped properly so delete the httpd process and logs

/lampp/logs/httpd.pid
/lampp/var/mysql/$(hostname).pid
/lampp/var/proftpd.pid

(Delete those files)

After restart the apache services or forcefully start the services
strace -Ff apachectl start

Method 5:
Apache failed to start because of port is already used.

Solution:

Check the PID using command prompt or terminal

For Windows: netstat -an


Monday 28 November 2016

How to Backup all Database in SQL server using query


Why Database backup is important?

An error can arise when trying to write or read a file that is required to operate the database. This is called disk failure because there is a physical problem reading or writing physical files on disk. A common example is a disk head crash, which causes the loss of all files on a disk drive. So database backup is important.


Step 1:

First open the sql management studio.

Step 2:

Login the sql management studio using credentials.


Step 3:

Select the database tab in left side panel.


Step 4:

Click new query button in the left corner of the page.


Step 5:

Enter the all database query in the query page.


Step 6: 

Change the database storing location in the query.


Step 7:

Click execute for run the query


Step 8:

Finally query executed successfully


(All database backup Query)

DECLARE @name VARCHAR(50) -- database name
DECLARE @path VARCHAR(256) -- path for backup files
DECLARE @fileName VARCHAR(256) -- filename for backup
DECLARE @fileDate VARCHAR(20) -- used for file name

-- please change the set @path = 'change to your backup location'. for example,
-- SET @path = 'C:\backup\'
-- or SET @path = 'O:\sqlbackup\' if you using remote drives
-- note that remotedrive setup is extra step you have to perform in sql server in order to backup your dbs to remote drive
-- you have to chnage you sql server accont to a network account and add that user to have full access to the network drive you are backing up to

SET @path = 'D:\backup\'  --set your backup path

SELECT @fileDate = CONVERT(VARCHAR(20),GETDATE(),112)

DECLARE db_cursor CURSOR FOR
SELECT name
FROM master.dbo.sysdatabases
WHERE name NOT IN ('master','model','msdb','tempdb')

OPEN db_cursor
FETCH NEXT FROM db_cursor INTO @name

WHILE @@FETCH_STATUS = 0
BEGIN
       SET @fileName = @path + @name + '_' + @fileDate + '.BAK'
       BACKUP DATABASE @name TO DISK = @fileName

       FETCH NEXT FROM db_cursor INTO @name
END

CLOSE db_cursor
DEALLOCATE db_cursor


Sunday 20 November 2016

How to login in webmail


Steps for logging into webmail
The steps below will show you how to login to webmail. In this example, we are assuming the email address you want to check is user@example.com

STEP 1:

Visit example.com/webmail

webmail.xyz.com


STEP 2:

Enter your username and password, and then click OK.
User Name: username@xyz.com
Password: (password)


STEP 3:

You should now be logged in! Click on one of the three webmail clients and get started using your email!
Do I choose SquirrelMail, Horder, or Roundcube?

Now you have to click Mail dropdown list


 STEP 4:


Finally you get like this following screen
                                      

Saturday 19 November 2016

How To Share Network Folder and Security Permission


Step 1:

First you have create a folder in network location and Share that folder


Step  2:

Click the permission Button and give the permission authorized users and click checkbox for control of permission of users.


Step 3:

Right click the folder and select security tab in folder properties and select the advanced button


Step 4:

Select the Change permission button for user inheritance permission in object parents

Step 5:

Uncheck the inheritance permission for object parent's folder permission 


Step 6:

Now click edit option in permission of specified folder and added the authorized person select the which access you want to add the users


Step 7:

If unauthorized person access your folder they will get like this network error


Tuesday 11 October 2016

YII framework installation on xampp


Step 1:

First install the xampp(any kind of version)

Step 2:

apache and mysql service start in xampp manager

Step3:

Set the PHP path in environment variable in management settings

(Select computer properties → select advanced tab→ select environment variables)

Step 4:

Down load the yii framework in yiiframework.com and rename the folder name is yii

Step 5:

Copy from yii folder to htdocs folder and give full rights

Step 6:

Open the command prompt and check command php.exe -v

Step 7:

Change the folder destination to c:\xampp\htdocs>

Step 8:

Now execute command is php.exe yii/framework/yiic.php webapp C:\xampp\htdocs\yii-app

step 9:

Now check the local host to http://localhost/yii-app


Wednesday 31 August 2016

Laravel 5 Installation in Linux


Step 1:

Requirements of Laravel framework installation in Linux

i) xampp or wampp

ii) Composer

iii) mcrypt

Step 2:

First you have to complete the xampp installation and then start the server using following command

   sudo /opt/lampp/lampp restart

Step 3:

Install the required softwares for laravel framework

   sudo apt-get install curl php5-cli git

   sudo apt-get install openssl

Step 4:

Install the composer using getcomposer.org

   curl -sS https://getcomposer.org/installer | php 
   sudo mv composer.phar /usr/local/bin/composer

Step 5:


Now you need to get important dependencies of laravel - mcrypt

   sudo apt-get install php5-mcrypt php5-json

And now run,

   sudo php5enmod mcrypt

To make sure it is running,

   php -i | grep mcrypt

Step 6:

Let us now move to directory of public_html

   cd /opt/lampp/htdocs

And then make directory like a laravel-projects

   mkdir laravel-projects

Now you have to execute the command for new projects

   sudo composer create-project laravel/laravel --prefer-dist

It’s gonna take its time. Just wait for it to finish. Once it is done, execute

   sudo chmod -R 775 laravel

Step 7:

Now move to the directory into laravel, then execute artisan-serve

  sudo php artisan serve

Finally visit the http://localhost:8000


Wednesday 17 August 2016

Laravel 5.0 installation in easy method


step 1:

Download and install the composer using getcomposer.org

step 2:

Install the composer using php variable path

ex: c:\xampp\php\php.exe

or

c:\wamp\php\php.exe

step 3:

Open the command prompt and then set global requirement for composer

composer global require "laravel/installer"

(it will take some time for installation)

step 4:

Set path variable to environment variables

set path = C:\Users\administrator\AppData\Roaming\Composer\vendor\bin

step 5:

Finally create a new project using laravel

c:\xampp\htdocs> composer create-project laravel/laravel --prefer-dist

c:\xampp\htdocs\laravel> composer update

step 6:

Finally open the project using browser

localhost/project_namr/public


Monday 18 July 2016

Squid3 configuration in Linux


Step 1:

sudo apt-get update && upgrade

Step 2:

sudo apt-get install squid3

Step 3:

sudo cp “/etc/squid3/squid.conf” “/etc/squid3/squid.conf.original”
(without quotes)

Step 4:

sudo gedit /etc/squid3/squid.conf
(Edit the squid configuration file)

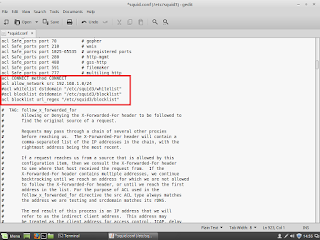
i) acl Connect method Connect (Line no: 919)
acl allow_network src 192.168.1.0/24
acl blocklist url_regex “/etc/squid3/blocklist”


 ii) Implement access list (Line no: 1058)

http_access allow localhost
http_access deny blocklist

http_access allow all (final process deny or allow)


iii) Change the port address (Line no: 1460)

http_port 3128


iv) Change the host name to visible (Line no: 4761)

visible_hostname fireproof


Step 5:

Add a new blocklist file in squid directory

sudo gedit /etc/squid3/blocklist
(To add url content in the blocklist)

Step 6:
Restart the squid server

sudo service squid3 restart

Step 7:
change the browser settings in mozilla or chrome

Add the proxy and port address in browser settings and refresh web page.


Thursday 23 June 2016

Xampp installation and default configuration in LINUX


Step 1:

Download the Latest xampp version for Linux

Step 2:

i)   Go to the  path  where you are stored in the specified location

ii)  Change the permission in xampp shell or run file using chmod

      chmod +x filename.run(xampp-linux1.8.3.run)

iii) Boot or execute the file using ./
      ./xampp-linux1.8.3.run

Step 3:

After execution you will get graphical mode installation in your display
Step 4:

After finish the installation you have to start the services using xampp control panel

    sudo /opt/lampp/manager-linux-x64.run

Step 5:

i)    Linux machine have default apache server supporting purpose first you have to stop that services
       sudo /etc/init.d/apache2 stop
       (This command used for stop the already running apache server)

ii)   Default apache path in linux machine
 
       sudo /etc/apache2/apache.conf

iii)  Next step is how to start xampp automatically in your machine
       sudo /opt/lampp/lampp start
       sudo gedit /etc/init.d/lampp

iv)  You will get new geditor on your machine and then type following two lines
       #!/bin/bash
       /opt/lampp/lampp start

v)  After close the editor then you have to execute the following commands
     sudo chmod +x /etc/init.d/lampp
     sudo update-rc.d lampp defaults

vi) Yeah! Finally you did the configuration... Done!!!


SVN SERVER REPOSITORY CREATION


STEP 1:
svnadmin create “d:\svn_repos”
(CREATE NEW REPOSITORY)

STEP 2:
GO TO D:\svn_repos\conf\
Svnserve.conf
[general]
anon-access = read
auth-access = write
passwd_db = passwd
Uncomment these lines in “svnserve.conf” file

STEP 3:
(OPEN NEW CMD WITH administrator rights)
set SVN_EDITOR = c:\windows\system32\notepad.exe

svnserve --daemon --root "d:\svn_repos"


Step 3 A
Add subversion variables in system variables
Path C:\Program Files (x86)\Subversion\bin
Extract svn service.zip and copy all the data to C:\Program Files (x86)\Subversion\bin

STEP 4:
(NOW CLOSE THE OLD CMD)
svnservice -install --daemon --root “d:\svn_repos”


STEP 4(a):

Svn mkdir svn://localhost/”project”

STEP 5:
(NOW START THE SERVICES)
sc configsvnservice start= auto
net start svnservice

STEP 6:
svn ls svn://localhost/