Sunday, 22 October 2017

How to Fix a BCD ERROR 'Boot Configuration Data File is Missing'


Step 1:

Insert your bootable os media to Laptop or Computer

Step 2:

Enter to the installation mode and click next.

Step 3:

Select repair your computer option left down side corner of the page


Step 4:

Select trouble shoot option and then select advanced option

Step 5:

Select the command prompt and type the following commands


x:\Sources> Bootrec /fixmbr
x:\Sources> Bootrec /fixboot
x:\Sources> Bootrec /scanos
x:\Sources> Bootrec /rebuildbcd

Select the option A for all

Step 6:

Type Exit and select continue option.


Saturday, 22 July 2017

How to config Login page in phpMyAdmin


Step 1:

Create new user in phpmyadmin or use the already created user

Step 2:

Go to phpmyadmin folder in xampp or wamp

Step 3:

Open the config.inc.php and check the authentication type information

Step 4:

Change the authentication type value 'config' to 'cookie'

$cfg['Servers'][$i]['auth_type']  = 'config';

to

$cfg['Servers'][$i]['auth_type']  = 'cookie';

Step 5:

Just refresh the phpMyAdmin page and now showing the login page


Friday, 21 July 2017

Flush DNS


Most operating systems and DNS clients will automatically cache IP addresses and other DNS results, this is done in order to speed up subsequent requests to the same hostname.

Step 1:

Press the start key and simply type the cmd

Step 2:

Right click on Command Prompt and click Run as administrator

Step 3:

Type the following command

c:\>ipconfig /flushdns


Step 4:

Type the exit command. Now check and refresh the webpage.

Wednesday, 21 June 2017

How Reset SA password in MSSQL Server


Step 1: Stop the sqlserver services using sql server configuration manager


Step 2: Select the sql server and click the properties and select the advanced tab


Step 3: Change the startup parameter in sql server properties. Add the -m value in front of
            existing values.


Step 4: Start the sqlserver services. Now sql server running single user mode 

Step 5: Start the CMD prompt and enter the 'sqlcmd' command

Step 6: Create a New user in mssql, Enter the following commands.

           CREATE LOGIN username WITH PASSWORD = 'password'
           GO
           sp_addsrvrolemember 'username','SYSADMIN'
           GO

Step 7: Stop the sqlserver service again for change the startup parameter values
    (remove the -m values in startup parameter)

Step 8: Start the sql services again using created login

Step 9: Now go to security option and change the SA user values in sql server

Step 10: Now use the sa user.


Wednesday, 24 May 2017

Apache Shutdown unexpectedly


Clear the issues for apache and sql failed to start, apache shutdown unexpectedly, port blocked and missing dependencies


STEP 1:

First go to xampp control panel and try to start the apache and Mysql

STEP 2:

Try to change the SQL port number 3306 to 3308. then again try to start the services. If its not work mean try to next step.

STEP 3:

Go to the location C:\xampp\mysql\data and remove the ib_logfile in that directory


STEP 4:

Then go to the control panel and try to start the services


Monday, 20 March 2017

Advanced Control panel Commands


Opens Press Windows + R and type:

Open Documents Folder

documents

Open Videos folder

videos

Open Downloads Folder

downloads

Open Favorites Folder

favorites

Open Recent Folder

recent

Open Pictures Folder

pictures

Adding a new Device

devicepairingwizard

About Windows dialog

winver

Add Hardware Wizard

hdwwiz

Advanced User Accounts

netplwiz

Advanced User Accounts

azman.msc

Backup and Restore

sdclt

Bluetooth File Transfer

fsquirt

Calculator

calc

Certificates

certmgr.msc

Change Computer Performance Settings

systempropertiesperformance

Change Data Execution Prevention Settings

systempropertiesdataexecutionprevention

Change Data Execution Prevention Settings

printui

Character Map

charmap

ClearType Tuner

cttune

Color Management
colorcpl

Command Prompt

cmd

Component Services

comexp.msc

Component Services

dcomcnfg

Computer Management

compmgmt.msc

Computer Management

compmgmtlauncher

Connect to a Projector

displayswitch

Control Panel

control

Create A Shared Folder Wizard

shrpubw

Create a System Repair Disc

recdisc

Data Execution Prevention

systempropertiesdataexecutionprevention

Date and Time

timedate.cpl

Default Location

locationnotifications

Device Manager

devmgmt.msc

Device Manager

hdwwiz.cpl

Device Pairing Wizard

devicepairingwizard

Diagnostics Troubleshooting Wizard

msdt

Digitizer Calibration Tool

tabcal

DirectX Diagnostic Tool

dxdiag

Disk Cleanup

cleanmgr

Disk Defragmenter

dfrgui

Disk Management

diskmgmt.msc

Display

dpiscaling

Display Color Calibration

dccw

Display Switch

displayswitch

DPAPI Key Migration Wizard

dpapimig

Driver Verifier Manager

verifier

Ease of Access Center

utilman

EFS Wizard

rekeywiz

Event Viewer

eventvwr.msc

Fax Cover Page Editor

fxscover

File Signature Verification

sigverif

Font Viewer

fontview

Game Controllers

joy.cpl

IExpress Wizard

iexpress

Internet Explorer

iexplore

Internet Options

inetcpl.cpl

iSCSI Initiator Configuration Tool

iscsicpl

Language Pack Installer

lpksetup

Local Group Policy Editor

gpedit.msc

Local Security Policy

secpol.msc

Local Users and Groups

lusrmgr.msc

Location Activity

locationnotifications

Magnifier

magnify

Malicious Software Removal Tool

mrt

Manage Your File Encryption Certificates

rekeywiz

Microsoft Management Console

mmc

Microsoft Support Diagnostic Tool

msdt

Mouse

main.cpl

NAP Client Configuration

napclcfg.msc

Narrator

narrator

Network Connections

ncpa.cpl

New Scan Wizard

wiaacmgr

Notepad

notepad

ODBC Data Source Administrator

odbcad32

ODBC Driver Configuration

odbcconf

On-Screen Keyboard

osk

Paint

mspaint

Pen and Touch

tabletpc.cpl

People Near Me

collab.cpl

Performance Monitor

perfmon.msc

Performance Options

systempropertiesperformance

Phone and Modem

telephon.cpl

Phone Dialer

dialer

Power Options

powercfg.cpl

Presentation Settings

presentationsettings

Print Management

printmanagement.msc

Printer Migration

printbrmui

Printer User Interface

printui

Private Character Editor

eudcedit

Problem Steps Recorder

psr

Programs and Features

appwiz.cpl

Protected Content Migration

dpapimig

Region and Language

intl.cpl

Registry Editor

regedit

Registry Editor 32

regedt32

Remote Access Phonebook

rasphone

Remote Desktop Connection

mstsc

Resource Monitor

resmon

Resultant Set of Policy

rsop.msc

SAM Lock Tool

syskey

Screen Resolution

desk.cpl

Securing the Windows Account Database

syskey

Services

services.msc

Set Program Access and Computer Defaults

computerdefaults

Share Creation Wizard

shrpubw

Shared Folders

fsmgmt.msc

Signout

logoff

Snipping Tool

snippingtool

Sound

mmsys.cpl

Sound recorder

soundrecorder

SQL Server Client Network Utility

cliconfg

Sticky Notes

stikynot

Stored User Names and Passwords

credwiz

Sync Center

mobsync

System Configuration

msconfig

System Configuration Editor

sysedit

System Information

msinfo32

System Properties

sysdm.cpl

System Properties (Advanced Tab)

systempropertiesadvanced

System Properties (Computer Name Tab)

systempropertiescomputername

System Properties (Hardware Tab)

systempropertieshardware

System Properties (Remote Tab)

systempropertiesremote

System Properties (System Protection Tab)

systempropertiesprotection

System Restore

rstrui

Task Manager

taskmgr

Task Scheduler

taskschd.msc

Trusted Platform Module (TPM) Management

tpm.msc
Turn Windows features on or off optionalfeatures

User Account Control Settings useraccountcontrolsettings

Utility Manager

utilman

Volume Mixer

sndvol

Windows Action Center

wscui.cpl

Windows Activation Client

slui

Windows Anytime Upgrade Results

windowsanytimeupgraderesults

Windows Disc Image Burning Tool

isoburn

Windows Explorer

explorer

Windows Fax and Scan

wfs

Windows Firewall

firewall.cpl

Windows Firewall with Advanced Security

wf.msc

Windows Journal

journal

Windows Media Player

wmplayer

Windows Memory Diagnostic Scheduler

mdsched

Windows Mobility Center

mblctr

Windows Picture Acquisition Wizard

wiaacmgr

Windows PowerShell

powershell

Windows PowerShell ISE

powershell_ise

Windows Remote Assistance

msra

Windows Repair Disc

recdisc

Windows Script Host

wscript

Windows Update

wuapp

Windows Update Standalone Installer

wusa

Versione Windows

winver

WMI Management

wmimgmt.msc

WordPad

write

XPS Viewer

xpsrchvw

Thursday, 16 March 2017

Easy way to Disable and Enable flashdrives in LINUX


Step 1:

First open the terminal(Ctrl + Alt + T).

Step 2:

Switch to the root mode or administrator mode in Terminal

# sudo bash


Step 3:

Type the following commands

# sudo chmod 444 /media/

This command is used for disable the media drives and including pendrive


Step 4:

# sudo chmod 777 /media/


This command is used for enable the media drives

Normally 4 is the changing the console permission

444 is represented from  (r-- r-- r--) attributes

Normally 7 is the execute the file permission

777 is represented from (rwx rwx rwx) attributes.

Tuesday, 28 February 2017

How to install Joomla in windows


Joomla is an open source content management system which based on PHP and MySQL.

Step 1:

Download the XAMPP installer package at  http://www.apachefriends.org/en/xampp.html

Step 2:

Run the installation file as you do with regular software and follow the step by step instructions.

Step 3:

Open “XAMPP Control Panel Application” and start “Apache” and “MySQL”.

Step 4:

Browse the localhost/phpmyadmin/

Step 5:

Create a new Database for joomla and create username and password for particular Database

Step 6:

Download the joomla from official site link
https://downloads.joomla.org/

Step 7:
Create a new folder in htdocs(eg: joomla30) and extract the downloaded pack to that particular folder

Step 8:
Go to the URL localhost/joomla30 and the continue following instructions

Step 9: Joomla admin panel configuration
i)  Select the languages
ii) Enter the name of your site
iii)Choose the status for access your site(If u need access only in online click Yes otherwise select No)
iv) Enter your valid e-mail ID
v)  Enter the custom username and password and Re-enter your password

Step 10: Database configuration
i)  Select Database Type
ii) Hostname default is 'localhost'
iii)Enter username and password for particular DB
iv) Database is already we created like joomla30
v)  Select the prefix of folder in Joomla

Step 11:
Now completed the configuration then you will get the window like this


Tuesday, 10 January 2017

How To install java and set environment path


Step 1:

First go to download the java pack using this link.

http://www.oracle.com/technetwork/java/javase/downloads/jdk8-downloads-2133151.html

Step 2:

Download the pack and right click to install, default path location is

"C:\Program Files\Java\jdk1.8.0_xx"

Step 3:

Now go to Advanced system settings in control panel and select advanced tab

Or

Select Windows key + break key and select advanced system setting in left side panel


Step 4:

Now select environment variables in advanced tab


Step 5:

Click new in local system variables and then type,

variable name : path

variable value : c:\Program Files\Java\jdk1.8.0_xx\bin;


Now click OK button and close the system variables.

Step 6:

Now you have to check "Javac" command in command prompt if u get messages without error now java is working fine.


Sunday, 1 January 2017

How To Import or Restore MSSQL(.BAK) DB


MS SQL is short for Microsoft SQL Server. It is a relational web hosting database that is used to store web site information like blog posts or user information. MS SQL is the most popular type of database on Windows servers. It is not free but it has many advanced features that make it suitable for businesses.

Step 1:
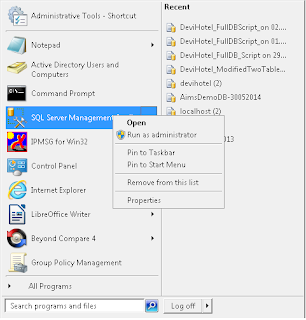
Open the SQL studio management


Step 2:
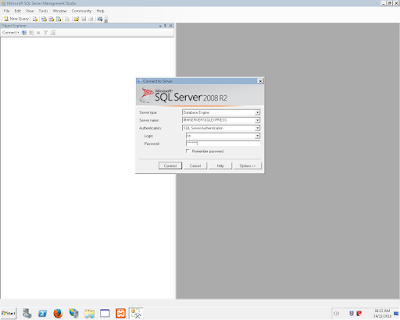
Enter your login credentials.


Step 3:
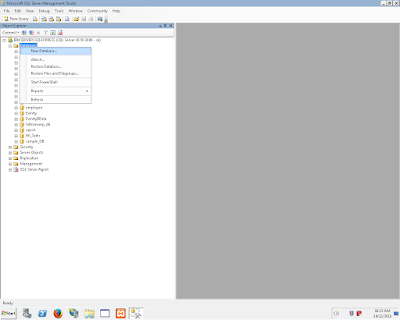
Select database option in your left panel then right click the database for create new database.


Step 4:
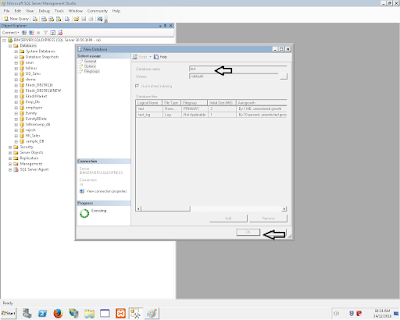
Enter a new database name for create DB. (eg: Database name is TEST) then Click next.


Step 5:
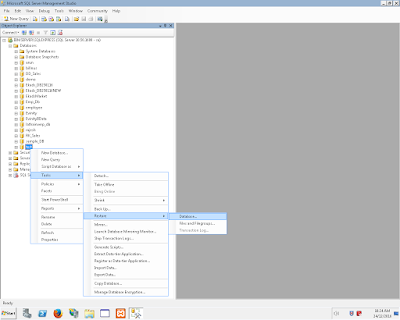
Now right click the test DB in left side panel then select task in sub menu and then select restore then click restore to database.


Step 6:
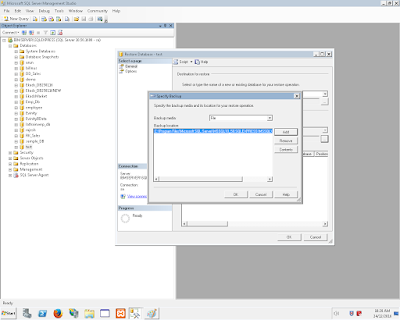
In windows, Select the radio button for restore the database from device and then click add button.


Step 7:
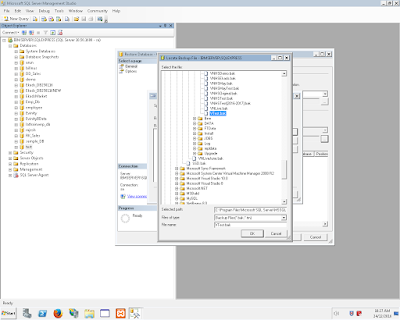
Select database for which database do u want to restore for test DB then click OK.(eg: test.bak)


Step 8:
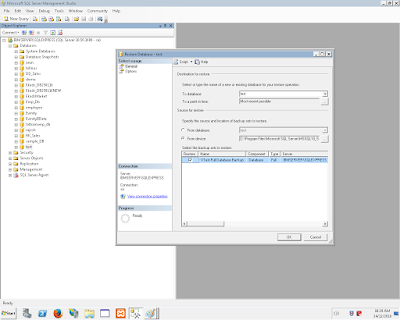
Select check box restore in select backup sets to restore option.


Step 9:
Select the check box overwrite existing database and replication settings in restore options then click next.


Step 10:
DB restore process is sucessfully completed.